Creatives connects performance evidence with three distinct production surfaces: Briefs defines what should be made, Studio generates and refines concepts, and Creative Assets holds material that is ready to inspect or reuse. Open Creatives when you need performance evidence. Open Briefs when the direction still needs definition. Open Studio when you already have an approved direction. Open Creative Assets when you need to find or inspect existing work.
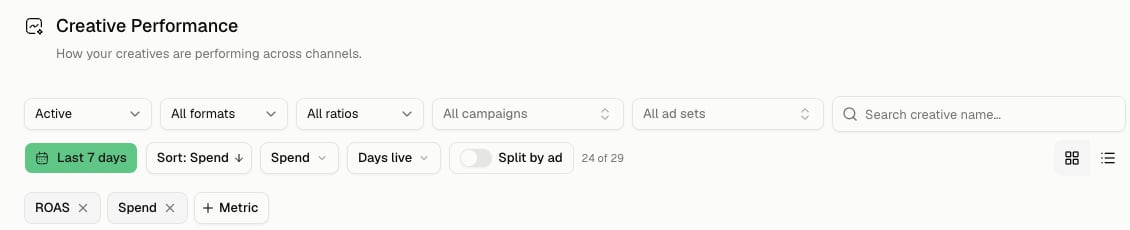
Creative Performance header with status, format, ratio, campaign, ad set, date, sort, metric, split-by-ad, search, and layout controls

Creatives keeps the measurement frame visible: status, format, ratio, campaign, ad set, date, sort, metrics, and grid or table view all change which assets you compare.

Before you begin

  • Confirm the active workspace and current Brand Profile.
  • Sync the relevant Shopify product when product identity, images, price, or destination matters.
  • Add the approved evidence, reference material, or working procedure to Knowledge before you ask the agent to rely on it.
  • Decide the audience, objective, offer, format, and acceptance criteria.
  • Know who must review claims, brand fit, and policy-sensitive material before it moves into a campaign.

Follow the creative lifecycle

Use the full path for important customer-facing work. Enter Studio directly only when the prompt already contains the decisions a brief would otherwise establish.

Create a brief

Select New brief from Briefs, then choose how much direction you want Marketer to develop.
Creative briefs page with status tabs, New brief and search controls, and an explainer for Brief, Avatar, and Ad brief levels

Creative briefs separates the batch-level Brief, each audience Avatar, and the Ad briefs that hold individual production direction.

Auto: develop the brief from product context

Use Auto when you have a product and a clear business request but still need distinct creative concepts.
1

Choose the product source

Select a synced catalog product, or provide the product URL when the form offers that route. Open the destination and confirm it represents the exact merchandise and offer you intend to market.
2

State what the brief is about

In What’s this brief about?, name the objective, audience, offer, channel, mandatory evidence, and prohibited claims. Do not use a product name alone as the direction.
3

Choose the number of concepts

Set Concepts from 1 through 8. Use multiple concepts when you need meaningfully different angles, not cosmetic rewrites of one idea.
4

Start and monitor creation

Start the brief. The progress view shows the current checklist and remains the source of truth if you close it and return later.
5

Review the generated brief detail

Open the completed brief. Confirm the product, audience, angle, format, message, and evidence for each ad brief before generating creative.

Manual: record a direction you already approved

Use Manual when the team already knows the direction and needs an editable brief record.
  1. Enter Name and Description.
  2. Use the available prompt chips—such as Format, Target audience, Tone, and Mandatory copy—to make the description executable.
  3. Select Create brief.
  4. Confirm the new brief opens with the intended identity and scope.
Manual creation does not invent missing strategy. If the audience, evidence, or acceptance criteria are still unresolved, resolve them before production.

Turn a brief into production direction

Open an ad brief inside the brief detail and review every field the creative will inherit.
1

Confirm the angle and format

Review Angle, Format, and Product. Use Angle ideas from research only when its supporting research is current and relevant to the stated audience.
2

Verify customer-facing copy

Inspect on-image copy, hooks, mandatory language, product facts, and any prohibited claim. Correct the brief rather than relying on a later visual review to catch a wrong premise.
3

Save the direction

Select Save changes and reopen the ad brief if necessary to confirm the saved values. An unsaved editor is not reliable production context.
4

Auto-generate this ad brief

Select Auto-generate when this ad brief is ready. When the output is linked to Studio, use Edit in Studio to continue; Generated in Studio identifies the destination of the generated work.
At the parent brief level, Generate creatives starts generation for every ad brief that does not have a creative. Use Auto-generate inside an ad brief when you want to start only that item. You can also upload material to a brief detail. Files that are not assigned to a specific ad brief remain in Unassigned until you place or remove them; do not assume an uploaded file automatically became generation context.

Generate and refine in Studio

Studio is language-first, with explicit controls that constrain what the prompt produces.
Studio Ad creatives composer with What do you want to make prompt and controls for image, aspect ratio, look, product, angle, persona, and count

Studio starts with a production composer where the prompt and visible controls define the image format, look, product, angle, persona, and output count.

1

Attach the required context

Choose Product when exact product identity matters. In the composer, type @ to add available References, Products, Avoid, or Angle context. Confirm every attachment before generating.
2

Set the output controls

Choose the available Format, Look, Type, Count, and Angle. For placement-sensitive work, select the required aspect, such as Story 9:16, Square 1:1, or Feed 4:5.
3

Write a discriminating prompt

Name the audience insight, single promise, proof, visual direction, mandatory copy, and exclusions. When requesting several concepts, describe the dimension that should differ between them.
4

Generate a focused set

Start generation and remain on the result until the concepts appear. The result set persists, so a later return should show the generated work rather than an empty composer.
5

Open and compare concepts

Open each concept detail. Compare product accuracy, message hierarchy, brand fit, visual legibility, placement fit, and meaningful differentiation under the same brief.
6

Refine the selected concept

Use the available edit or refinement controls with a specific correction. Preserve the approved parts and state exactly what should change; a generic “make it better” instruction can undo a correct decision.
7

Save approved work

Save the selected result to the library. If Studio asks you to choose concepts first, select only the versions that passed review, then confirm they appear in Creative Assets.
Leaving Studio with unsaved prompt text or attachments can discard that working state. Save the intended concept or copy the direction before accepting a close warning.

Use the agent-led creative route

You can ask the Marketing Agent to coordinate a larger creative request when the work needs research, campaign context, or several specialists. The agent may return a proposal before running the creative pipeline. Review the steps and authority on that proposal before approval.
Marketing Agent creative pipeline detail showing the campaign manager path and a completed three-step checklist for creative direction, campaign concepts, and launch-ready assets

Agent-led creative work exposes the specialist path and completion checklist without replacing direct review in Briefs, Studio, and Creative Assets.

Choose this route when coordination is the hard part. Choose Briefs or Studio directly when you already know the direction and need hands-on production control. In either route, the resulting creative still requires customer-facing review.

Inspect and reuse Creative Assets

Open Creative Assets after saving or uploading material.
Creative Assets header with format tabs, asset count, label, upload, grid, table, search, and Sync from Meta controls

Creative Assets is the searchable library for saved or synced images, videos, and carousels; use its format tabs, search, labels, and layout controls before opening an item.

  1. Choose All, Images, Video, or Carousel to match the expected format.
  2. Search by the identifying text available for the item. Switch between grid and table view when one makes identity easier to verify.
  3. Apply aspect or persona filters when those controls have data in the workspace.
  4. Open the creative detail. Confirm the visual, copy, metadata, usage, and the campaign or brief relationship before reuse.
  5. Go to Creatives for delivery evidence; the Creative Assets library is not the performance source of truth.
Manual upload to the creative library requires an active Meta connection in the current product flow. If Meta is unavailable, repair that connection rather than assuming a failed upload created an asset.

Move approved creative into a campaign

Select Use in campaign from the reviewed Studio result when that action is available.
  • Confirm the intended concept, product, destination, and format before the handoff.
  • In Campaigns, verify that the creative appears on the correct ad and that its copy and destination survived the handoff.
  • Continue through the provider-specific campaign review.
  • Treat the new campaign as a draft until validation, approval, and launch progress prove otherwise.

Choose the right branch

Completion checklist

  • The active workspace, product, destination, and brand context are correct.
  • The brief records the audience, objective, angle, proof, mandatory copy, exclusions, format, and review criteria.
  • Every generated concept is traceable to the intended brief or direct Studio direction.
  • Product facts, price, availability, claims, and visual identity were checked against approved sources.
  • The selected concept meets the destination’s aspect, legibility, and placement requirements.
  • The approved result appears in Creative Assets with the expected format and identity.
  • A campaign handoff, if used, preserved the creative, copy, and destination and remains subject to campaign approval.

Troubleshooting

Confirm the Shopify connection, the latest product sync, and the exact product or URL selected in New brief. Reopen the destination and verify it before restarting; a typed name does not substitute for the synced record.
Tighten What’s this brief about? with audience, objective, offer, proof, exclusions, and a meaningful distinction between concepts. Use Manual when the strategic decisions already exist and should be preserved exactly.
Return to the ad brief, confirm Save changes completed, then reopen the record before selecting Auto-generate. Remove stale attachments or Studio context that conflicts with the saved direction.
Inspect the Product control and every @ attachment. Remove the wrong record, attach the exact one, state which reference is inspiration versus factual source, and regenerate only after the context row is correct.
Give each option a different audience insight, angle, or visual system while holding the product, offer, and objective stable. Increasing Count without a differentiation rule usually produces more near-duplicates.
Confirm the Studio save completed, clear search and filters, and select the expected format tab. Reopen the Studio result if generation or save is still active or failed.
Return to the reviewed Studio concept and repeat Use in campaign once. In the campaign draft, verify the correct ad and destination before continuing; do not publish based on an assumed handoff.

Next step

Measure creative performance

Compare delivered creative under one explicit source and date frame.

Start from a product

Ground the brief and Studio output in a synced Shopify record.
Last modified on August 9, 2026