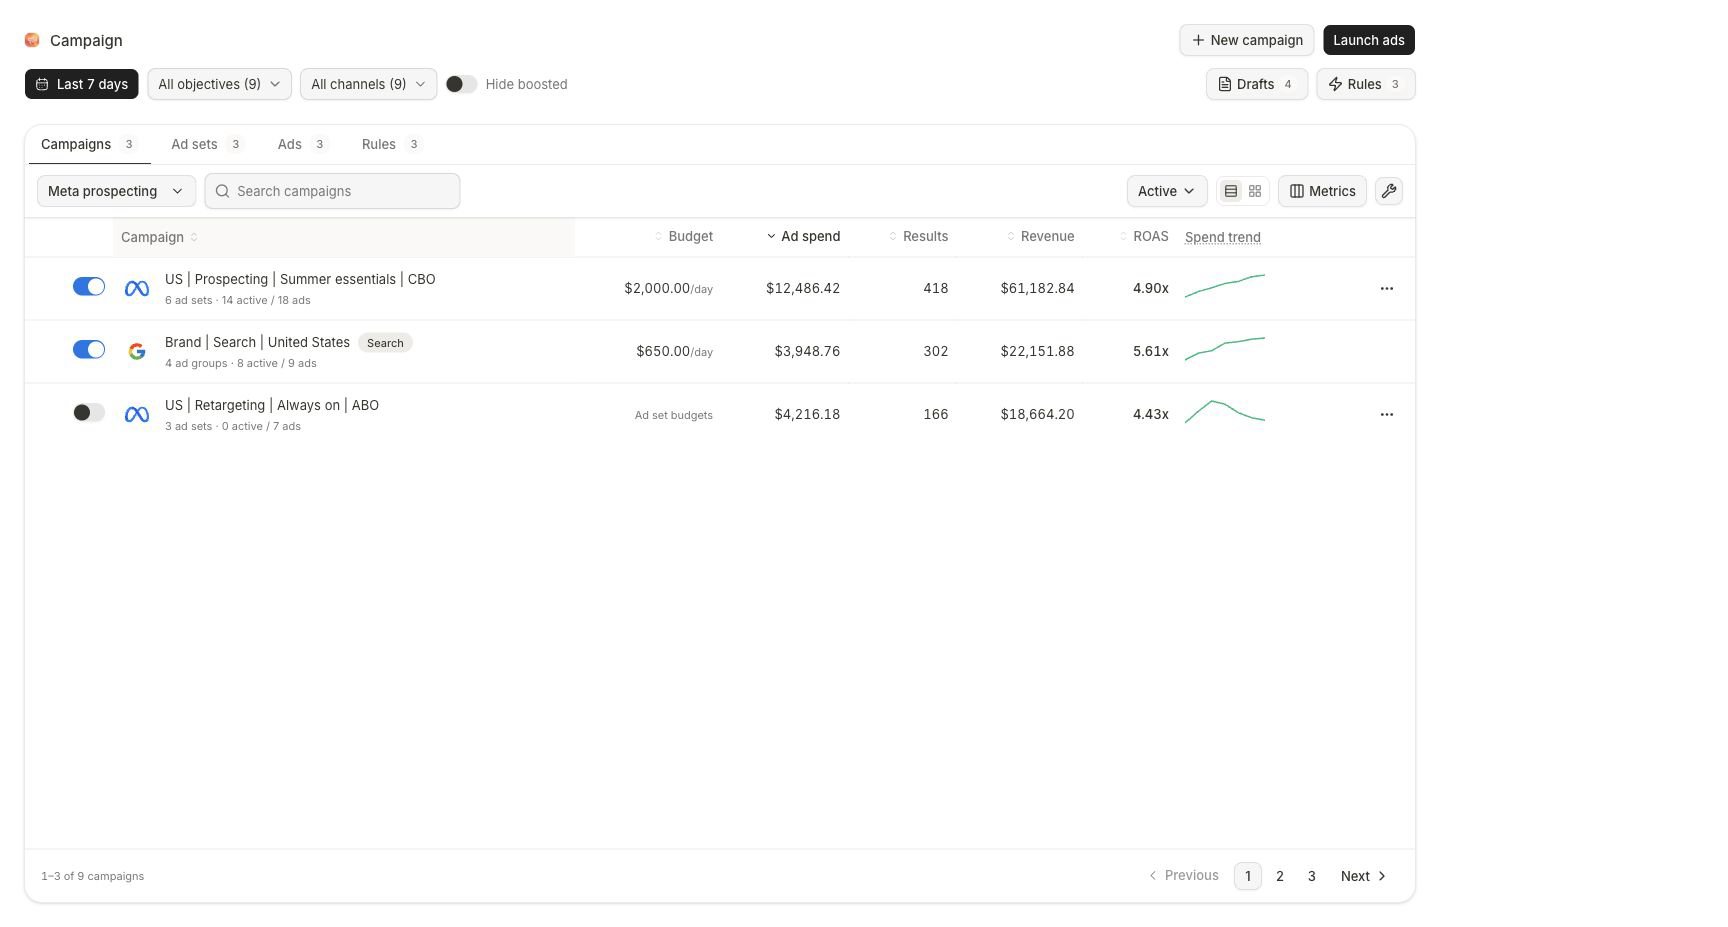
Campaigns is where you inspect synced advertising objects and prepare supported Meta or Google Ads work. It separates three states that should never be confused: an existing provider object, an editable Marketer draft, and a launch that is publishing or already live. Open Campaigns and confirm the active workspace before you read metrics or create anything.

Before you begin

You need:
  • A connected Meta Ads or Google Ads account for the workspace.
  • A completed initial sync if you need to inspect existing objects.
  • A workspace role that allows the intended create or change action.
  • The product or destination, objective, audience, budget boundary, and creative direction for new work.
  • An approver when workspace guardrails require a decision before an account change.
Campaigns overview with date, objective, channel, and boosted filters; Campaigns, Ad sets, Ads, and Rules tabs; Drafts and Launch ads actions; and a scoped campaign table

Campaigns keeps scope controls, object levels, lifecycle work, and the data table in one operating surface.

Read the page before you act

Work from the top of the page downward: The table can show budget, spend, results, revenue, ROAS, and trend context for the selected window. Treat those figures as observations, not explanations. Move to Analytics when you need a cross-channel or attribution-aware diagnosis.

Investigate an existing campaign

1

Restore a known scope

Open the saved-view menu and choose All view when you do not trust the current filters. Then set the date, objective, channel, and status required by the question.
2

Choose the object level

Start on Campaigns for campaign-level rows. Move to Ad sets for audience, budget, and optimization context, or Ads for the delivered creative. The selected tab becomes the grain of every visible row.
3

Find and identify the object

Search for the provider name, open the row, and confirm its parent-child relationship. Similar names are not sufficient evidence; verify the provider badge and the object level.
4

Read the result in context

Compare spend and the primary result first, then efficiency and trend. Keep the date, currency, attribution view, and status filters unchanged while comparing rows.
5

Choose the next surface

Open Analytics for a broader explanation, Creative performance for asset evidence, or the row’s available control for a scoped change. If a control can mutate the provider account, record the current state before proceeding.
6

Verify the outcome

After a change finishes, return to the same provider, level, object, and date scope. Confirm the new state in Campaigns and, for a decision-grade check, in the provider account.

Save a reusable campaign view

Use a saved view for a recurring review such as Meta prospecting, paused campaigns, or a Google brand-search portfolio.
Campaign views menu showing All view, a selected Meta prospecting view, shared team views, and the Add view action

Saved views restore a named filter bundle; All view is the clean reset point.

  1. Set the level, date preset, objective, channel, status, and search state you want to preserve.
  2. Open the view menu. If the trigger reads Custom filters, the current scope does not match a saved view.
  3. Choose Add view, give the view a specific name, and choose whether it should be shared when that option is available.
  4. Reopen the view and confirm every visible filter changed to the intended value.
  5. Use All view to restore the default Campaigns scope before starting an unrelated investigation.
A saved view stores scope, not a conclusion. Its rows and metrics continue to change as provider data syncs and the selected date window advances.

Build a new campaign

1. Choose the provider path

Select New campaign. The chooser exposes the builders currently supported by the workspace.
Create new campaign dialog with Meta and Google Ads channel cards and an Advantage Plus Catalog campaign link

The first decision is the provider: Meta for Facebook and Instagram, or Google Ads for its supported campaign types.

  • Choose Meta for a Facebook or Instagram campaign.
  • Choose Google Ads for the Search, Shopping, or Performance Max paths shown by the builder.
  • Choose the catalog link only when you intend to build the displayed Advantage+ Catalog path from product-catalog context.
If the intended provider or account is unavailable, stop and repair it in Integrations. Do not build against a different connected account as a substitute.

2. Establish the Meta campaign

For Meta, Set up the campaign establishes the shared campaign-level facts before ad-set and ad work.
Meta campaign setup showing campaign name, campaign budget and ad set budget choices, Sales objective, exclude existing customers, ad account, Facebook page, destination URL, Save as draft, and Create and build

Meta setup captures the campaign identity, budget model, objective, publishing account, page, and destination before detailed construction.

1

Confirm the generated name

Review Campaign name against the workspace naming convention. Use Regenerate or edit it before it becomes hard to distinguish from related tests.
2

Choose the budget owner

Select Campaign budget (CBO) when Meta should distribute one shared budget, or Ad set budget (ABO) when each ad set needs its own amount. With ABO, the next step owns the budget values.
3

Choose the objective and acquisition boundary

Select Campaign objective. Review Exclude existing customers when it appears; do not leave it enabled or disabled without confirming whether acquisition or retention is intended.
4

Choose where the campaign publishes

Under Publish to, confirm the exact ad account and Facebook page. Add the default destination URL and open it to verify the product, offer, and live page.
5

Review attribution and budget fields

For eligible Meta objectives, review the attribution settings shown by the form. For CBO, enter the daily budget in the selected ad account’s currency; for ABO, continue knowing each ad set will require its own budget.
6

Choose a lifecycle

Select Save as draft to stop with an editable campaign record. Select Create and build to open the builder and continue with ad sets, audiences, conversion settings, and creative.
The Google Ads path asks for fields appropriate to its selected campaign type. Follow the builder’s visible requirements; do not transfer Meta’s hierarchy, attribution windows, or budget assumptions into Google Ads.

3. Complete the tree

In the builder:
  1. Confirm the campaign summary and status is Draft.
  2. Add or open each ad set or Google ad group required by the plan.
  3. Review audience or targeting, geography, optimization, conversion, schedule, and the budget owner shown for that object.
  4. Add the intended ads and verify creative, copy, destination, and format for every item.
  5. Open Review. Resolve every validation blocker; a ready summary is the publish gate, not a reason to skip human review.
  6. Use Back to edit when the summary, ad-set count, ad count, or destination is wrong.
  7. On publish, review the displayed target state and any confirmation dialog. A confirmed launch opens launch progress; it does not instantly prove every provider object succeeded.

Resume drafts and launches

Select Drafts from Campaigns when work was saved, interrupted, or is already publishing.
Campaigns Drafts drawer showing Meta and Google drafts with Review actions and a publishing campaign with View progress

The Drafts drawer separates editable drafts from work already publishing and provides the correct next action for each state.

Use Launch ads to open the launch roster. Read the launch result before retrying. A partial or failed launch needs object-level review; submitting a second launch can create duplicates.

Decision points

Completion checklist

  • The workspace, provider, and provider account are correct.
  • The campaign, ad-set or ad-group, and ad hierarchy matches the plan.
  • Names, objective, audience, conversion, creative, destination, budget, currency, and schedule are correct.
  • Review shows no unresolved validation blocker.
  • Any required approval was made against the exact proposal.
  • Launch progress reached a terminal result for every expected object.
  • Campaigns and the provider show the expected post-launch state.

Troubleshooting

Confirm the provider connection, selected account, first-sync state, date, channel, objective, status, saved view, and search. If the source is still importing, wait for the Campaigns sync state rather than interpreting the table as empty.
Choose All view, move to the correct object level, clear search, and include its current provider status. Then compare the provider object with the latest Marketer sync state.
Align date window, account, currency, attribution source, and object level. Campaigns is an object table; Analytics may show a different channel or attribution frame.
Complete the visible required fields. For Meta, confirm the campaign name, objective, budget model and amount where required, ad account, Facebook page, and destination URL.
Read every blocker on Review. Check ad-set or ad-group configuration, conversion destination, budget, schedule, creative completeness, and connected-account health. Do not bypass a blocker by recreating the campaign.
Open Drafts or Launch ads and use View progress. Also check task activity and Awaiting action. Retry only after the original launch reaches a terminal failure and you understand which objects were created.

Next step

Explain performance

Build a source-aware explanation before changing a campaign.

Review a pending decision

Verify the scope and effect of a proposed account change.
Last modified on August 9, 2026